Get Yacht Clubs Manager running at your club. Book a 20-minute walkthrough.
You have just taken on the membership secretary role. Maybe your predecessor handed you a folder of paper forms, or maybe just a login. Either way, you are now the person who decides what the club asks people when they apply, who looks at each application, and who makes sure new members end up with a working account and the right membership type. This guide walks through how membership applications work in Yacht Clubs Manager, from designing the form to a new member's first login, and the decisions that are yours to make along the way.
Where everything lives
In the admin console, open Membership. Along the top you will see four tabs: Members, Invitations, Membership Types and Applications. The Applications tab carries a red count when applications are waiting, and the same number appears as a to-do item on the admin dashboard under "Needs Attention", alongside things like overdue invoices and booking approvals. If you only check one screen each week, check the dashboard.
Before anything else, set where new-application emails go. Under Settings there is a "Membership Application Notifications" box with a single email address. Every new application sends a message there, prompting someone to log in and review it. A role address such as a membership@ mailbox is better than your personal email, because it survives the next handover.
Start with your membership types
The application form's "Membership Type" dropdown is filled from your club's own list, so get that list right first. Go to Membership Types and use Add Type for each category you offer: single, family, junior, cadet, honorary, whatever your rules say. Each type can be linked to an invoice category, which is how the treasurer's pricing and the membership list stay in step.
When a category is retired, do not delete it if members still hold it. Open it with Manage and untick Active instead. Inactive types are hidden from new applicants but existing members keep them.
Designing the application form
Open Applications, then the Form Settings sub-tab. The form starts with built-in fields: first name, last name, email address, phone, membership type and an "About Me" box. You can relabel them, change placeholder text, reorder them and, apart from email, hide them or make them optional. Proposer and seconder are ordinary text fields rather than fixed ones, so if your club's rules call for them you can include them and make them required, and if not you can leave them off. They are free text: the names are not checked against the membership list and nobody is contacted automatically, so if your rules require the proposer and seconder to confirm, that is still a job for you or the committee.
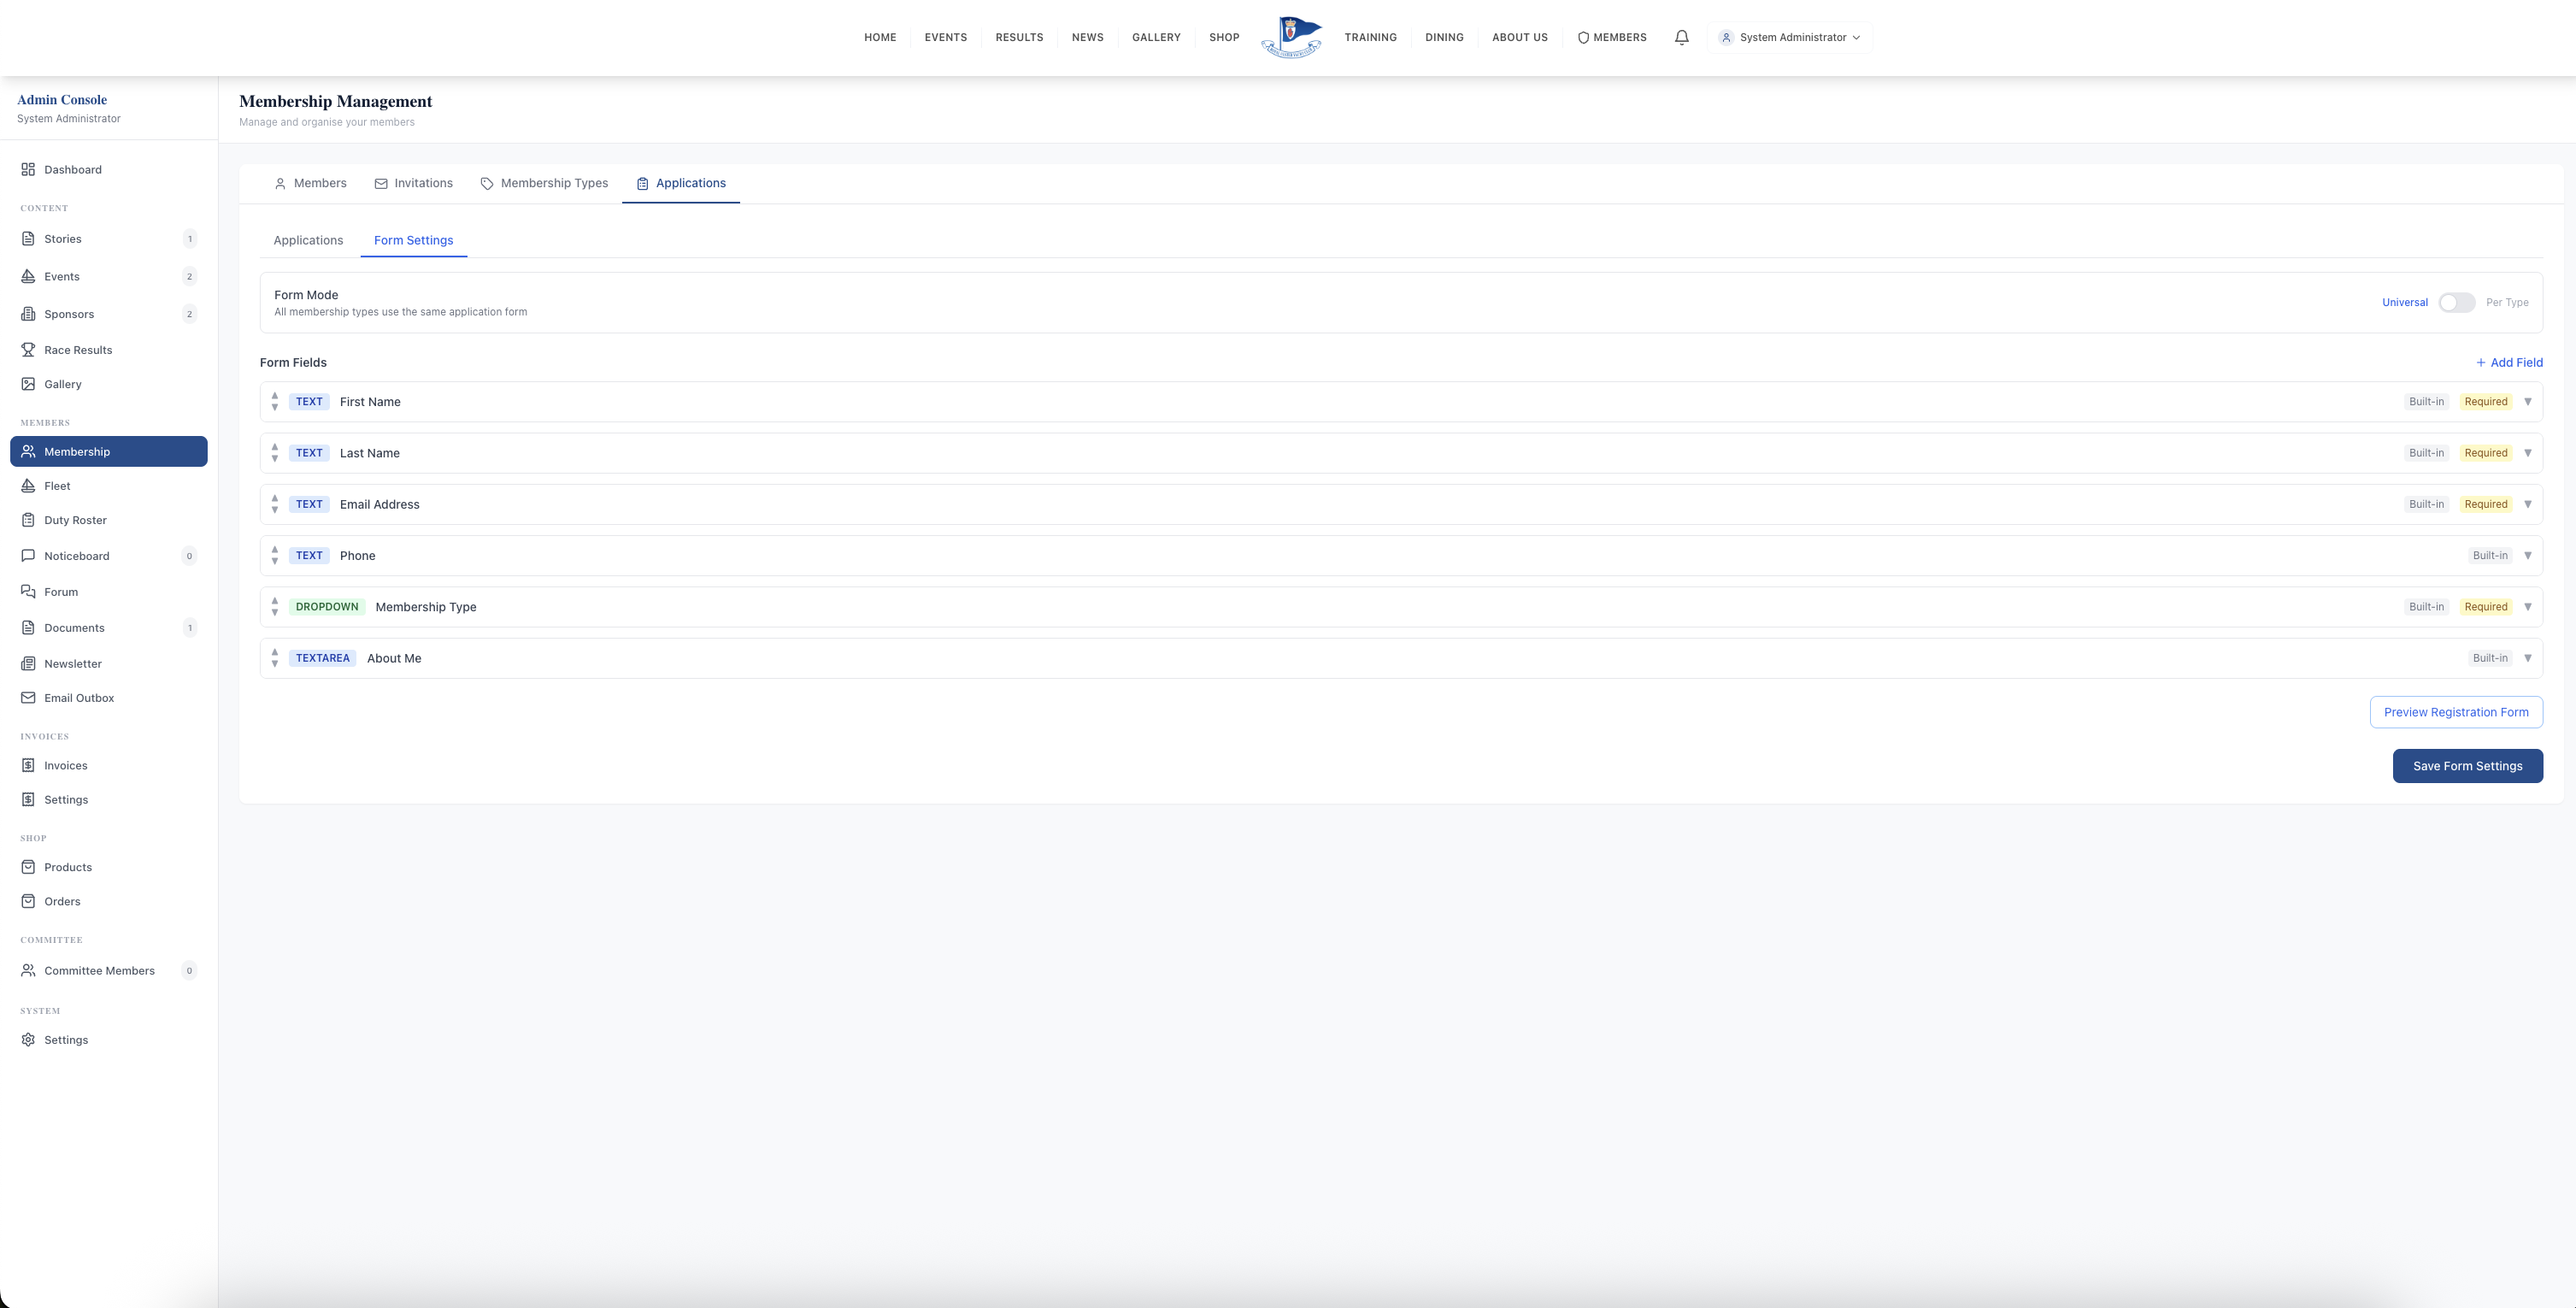
Add Field lets you ask anything else the committee needs. Field types are text, multi-line text, date, dropdown, radio buttons, checkbox and file upload. File upload is useful for things like a proof of age for a junior category or a copy of a sailing certificate; you choose whether PDF, JPEG or PNG are accepted and set a maximum file size.
At the top of the screen is Form Mode. Leave it on Universal and every applicant sees the same form. Switch to Per Type and each membership type can have its own version, with a default form used for any type you have not customised. A family application might ask for the number of children; a junior one might ask for a parent's contact details. Use Preview Registration Form before you press Save Form Settings.
A practical tip: keep the application short. It only needs enough for the committee to decide. Everything else (address, emergency contacts, boats, qualifications) is collected later in the sign-up steps, once the person has been accepted.
Reviewing applications
Applications arrive on the public website's membership page and land in the Applications list, filtered to Pending by default. You can switch to All, Accepted or Declined, and search by name or email. Each card shows the applicant, their chosen membership type, contact details and what they wrote about themselves. Open one to see every answer, including proposer and seconder names and any uploaded files.
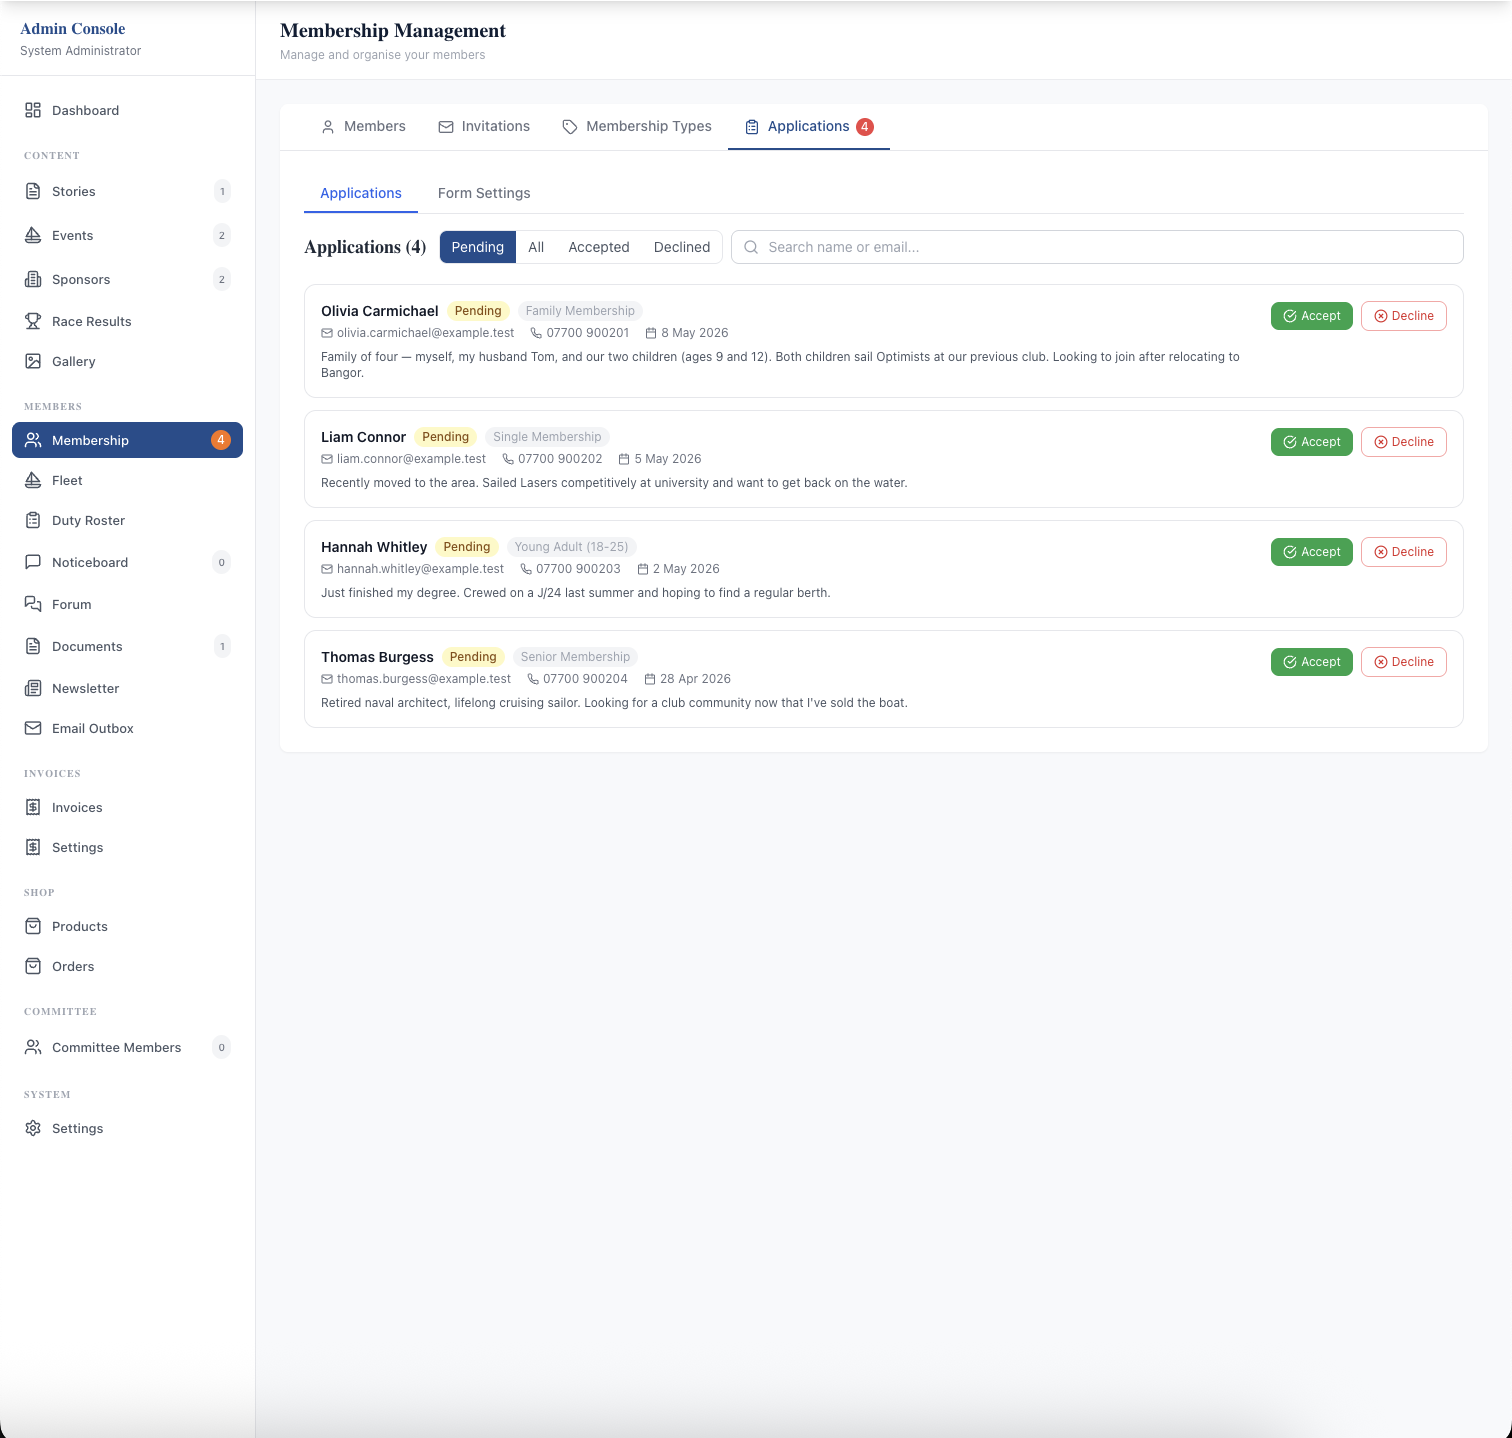
Once the committee has decided, you have two choices:
- Accept. The applicant is sent an invitation email straight away. The link in it is valid for 7 days and takes them into the step-by-step sign-up for their membership type.
- Decline. You are asked to choose between Decline & Send Email, which sends a polite message saying the application was not successful, and Decline Quietly, which records the decision without emailing anyone. Quiet declines are meant for spam and obviously invalid submissions.
If your club wants to give a reason for declining, write to the applicant yourself; the automatic email is deliberately general. Decided applications are cleared out automatically 12 months after the decision, uploaded files included, so the list does not become a store of old personal data.
Tailoring the sign-up steps per membership type
Accepting someone is only half the job. The invitation opens a guided sign-up where the new member fills in their own details and chooses a password. You decide what that sign-up asks, and you can decide it separately for each membership type.
On the Membership Types tab, pick a type and look at Registration Sections. Account overview and personal details are fixed. Spouse details, family members, emergency contacts, qualifications, boat ownership and additional information can each be set to Required, Optional or Hidden. A sensible starting point:
- Family membership: family members required, spouse optional.
- Junior or cadet: emergency contacts required, boats hidden.
- Social or non-sailing: qualifications and boats hidden.
If the built-in sections do not cover something, use Add Custom Section and give it its own fields (text, text area, dropdown, checkbox, date or number). Custom sections can be moved up and down, and each has its own required, optional or hidden setting. The password and final review steps always come last. A live preview on the right shows what the new member will see as you change things.
For a member's-eye view of the whole process, see joining your sailing club online.
Inviting and adding members directly
Not everyone comes through the public form. On the Invitations tab you have three routes:
- Send Invite for one person: enter their email, name, membership type and club join date. They get the same invitation email and sign-up as an accepted applicant. There is also a tick box for someone who has already paid this year's fees outside the system, so they are not invoiced on joining.
- Upload for many people at once: a spreadsheet with exactly three columns, First Name, Last Name and Email. You review the list before anything is sent. This is how most clubs bring their existing members across; there is more on that in moving club members off spreadsheets.
- Add member when you need the account to exist now, for example someone who has joined in person and wants to be on the list straight away. You fill in the essentials, including their email address, the account is created, and the member is emailed a temporary password valid for 14 days. They must choose their own password the first time they sign in.
Pending invitations can be resent, cancelled or deleted from the same tab. If someone says the link has expired, resend it rather than creating a second invitation. Sending invitations, adding members directly and resending all need full admin access, so if you have a narrower set of permissions, ask whoever manages committee access.
What about the joining fee?
A joining invoice is only raised automatically if the club has turned on "Bill new members when they join" in the treasurer's invoice settings. It is off by default. When it is on, the invoice is raised as the member completes sign-up, based on the price of the invoice category linked to their membership type, and pro-rated to the renewal date if the club uses a fixed one. Agree with the treasurer who owns this setting. The choices are covered in choosing membership renewal settings.
A season's routine
- Before the season: check membership types, the application form and the sign-up sections for each type.
- Weekly: clear the Applications list and resend any invitations that have lapsed.
- Before each committee meeting: filter to Pending and bring the list.
- At handover: update the notification email address and make sure your successor has their own login with the right permissions.
That last point matters more than it sounds. The next membership secretary should not inherit your password; they should be given membership access on their own account. See club committee roles and permissions for how to set that up.
Where to go next
For an overview of the form builder, see custom application forms, and for the member list, invitations and member records, see member management.
Like the read? See it running with your club's data — book a demo.